

A gutter guard is only as effective as the gutter underneath it. Before learning how to install gutter guards, make sure the existing system is securely fastened, properly pitched, and capable of moving water toward a functioning downspout. Covering a damaged or clogged gutter can hide the problem for a while, but it will not stop water from overflowing near your foundation, siding, or landscaping.
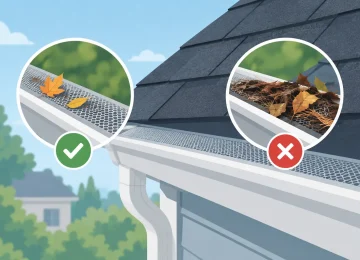
For homes and commercial properties in New Jersey and Staten Island, gutter guards can reduce routine debris buildup from leaves, seed pods, pine needles, and roof grit. They are not a replacement for professional maintenance, especially after severe weather, but the right product and installation can make cleaning safer, less frequent, and more manageable.
Start With the Right Type of Gutter Guard
There is no single gutter guard that works perfectly on every roof. The best choice depends on your roof pitch, shingle condition, gutter size, surrounding trees, and the volume of water the system handles during heavy rain.
Screen guards are generally simple to install and work well against larger leaves. However, smaller debris can collect on top of the screen, and fine openings may require periodic brushing to maintain water flow. Mesh guards have smaller openings and are often better for fine debris, but quality varies significantly. A flimsy mesh guard may sag, clog, or pull loose over time.
Reverse-curve and surface-tension guards are designed to guide water into the gutter while debris falls away. These products can perform well when installed correctly, but they are more sensitive to roof edge details, gutter position, and rainfall intensity. Foam inserts and brush-style guards are easy to place inside a gutter, though they can hold organic material and may need more frequent attention than homeowners expect.
For a long-term result, choose a guard designed for your specific gutter profile. Standard 5-inch and 6-inch K-style gutters, half-round gutters, and commercial box gutters do not all accept the same products. Avoid selecting a guard based only on the lowest price or a one-size-fits-all claim.
Inspect and Clean the Gutter System First
Installing guards over debris is one of the most common mistakes. Remove leaves, shingle granules, dirt, and any standing water from the gutter trough. Flush each run with a hose to confirm water reaches the downspout and exits away from the building.
Look closely for loose hangers, separated seams, rust, cracks, and sections that hold water after flushing. Gutters should slope gradually toward the downspout. If water sits in the middle of a run, the problem may be improper pitch, not a lack of guards.
Check the fascia board and roof edge as well. Soft or rotted fascia can prevent hangers and guard fasteners from holding securely. If shingles are brittle, lifted, or near the end of their service life, avoid forcing guard edges under the shingle course. That can damage the roof or interfere with proper water shedding.
Gather Tools and Plan for Safe Access
Most clip-on or screw-fastened gutter guards require a stable extension ladder, work gloves, eye protection, tin snips, a tape measure, and a drill or driver with the correct bit. Depending on the system, you may also need self-tapping screws, approved clips, and sealant.
Ladder safety matters more than speed. Set the ladder on firm, level ground and keep it positioned so you can work without leaning sideways. Use a ladder stabilizer when possible to reduce pressure on the gutter and create a safer working position near the roofline. Never install guards from a wet ladder, during high winds, or when thunderstorms are approaching.
For two-story buildings, steep roofs, difficult ground conditions, or long commercial gutter runs, professional installation is often the safer choice. A guard installation may look straightforward from the ground, but poor access and rushed work can lead to falls, bent gutters, and roof damage.
How to Install Gutter Guards Step by Step
The exact installation method depends on the product, so always follow the manufacturer’s instructions. Still, most surface-mounted mesh and screen guards follow a similar process.
Measure Each Gutter Run
Measure the full length of each gutter section before cutting materials. Account for inside corners, outside corners, end caps, downspout outlets, and areas where gutter sections meet. It is better to plan cuts before climbing than to repeatedly work around awkward pieces on the ladder.
If guards overlap, follow the manufacturer’s recommended overlap direction. In most cases, overlaps should face away from the primary water flow so debris is less likely to catch on an exposed edge.
Position the Rear Edge Carefully
Many guards use a rear flange that slips beneath the first course of shingles or rests along the back of the gutter. Do not nail, staple, or screw through shingles unless the roof and guard manufacturer specifically call for it. Unnecessary penetrations can create leak risks and may affect roof warranty coverage.
On roofs where tucking beneath shingles is not appropriate, use guards that fasten directly to the gutter lip and rear wall. This approach can provide a dependable fit without disturbing the roofing material.
Secure the Front Edge to the Gutter Lip
The front edge of the guard should sit firmly on or under the gutter’s outer lip, depending on the design. Clip-on systems should snap into place without bending the gutter. Screw-fastened systems should be secured at the spacing recommended by the manufacturer, particularly near seams, corners, and high-wind areas.
Do not overtighten fasteners. A screw driven too hard can deform thin aluminum gutters or tear the guard material. The goal is a secure, even fit that does not rattle, lift, or create wide gaps where debris can enter.
Cut and Finish Corners Neatly
Use tin snips to make clean cuts around corners, end caps, and downspout locations. Sharp cut edges should be tucked down or covered according to the product instructions. Leaving exposed metal edges can create a safety hazard during future cleaning.
Corners deserve extra attention because they collect more debris and experience more water movement. If the guard system includes preformed corner pieces, use them. Improvised overlaps may work temporarily but can become collection points for leaves and roof grit.
Test Water Flow Before You Call It Finished
After installation, run water from a hose along the roof edge or directly over the guards. Watch how water enters the gutter, particularly near valleys and above downspouts. A small amount of water behavior can reveal a major issue, such as a guard sitting too flat, a gap between sections, or overshooting during high-volume flow.
Keep in mind that a garden hose does not perfectly duplicate a hard New Jersey downpour. Still, it is useful for identifying obvious installation problems while they are easy to correct.
Common Gutter Guard Installation Mistakes
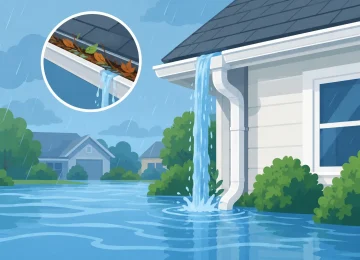
A guard should support drainage, not create a new obstruction. Avoid installing guards on gutters that are undersized for the roof area or already overflow in heavy rain. In that situation, the system may need larger gutters, additional downspouts, or improved gutter pitch before guards are added.
Another mistake is ignoring roof valleys. Valleys send concentrated water and debris into a small section of gutter. Some guard styles work well there, while others may be overwhelmed. A professional can evaluate whether a reinforced guard section, splash control, or drainage adjustment is needed.
Finally, do not assume gutter guards eliminate maintenance entirely. Fine grit, roof granules, and windblown debris can still accumulate. A seasonal visual inspection helps catch loose sections, debris dams, and drainage concerns before they become water damage.
When Professional Installation Makes Sense
Professional installation is a practical investment when your gutters need repair, replacement, or re-pitching before guards are added. It also makes sense for properties with high rooflines, intricate roof designs, heavy tree coverage, or recurring overflow issues.
A gutter specialist can match guard materials to the existing gutter system, confirm that downspouts are carrying water away correctly, and install the product without compromising the roof edge. Cavallari Gutters provides gutter guard installation with the same focus on workmanship, clean execution, and dependable drainage that every property deserves.
If your gutters are overflowing, pulling away from the fascia, or filling with debris after every storm, address the drainage system before the next heavy rain turns a routine maintenance job into an exterior repair.
Leave a Reply